My shopping cart
Your cart is currently empty.
Continue ShoppingLast Updated: September 30, 2026
To install microcement flooring successfully requires specific tools and materials to achieve a professional finish.
Gather bonding primer for substrate adhesion, fiberglass reinforcement mesh to prevent cracking, and the multi-component microcement system you'll mix on-site.
For tools, use a standard trowel for the base coat and a flexible squeegee trowel for finishing. Include mixing paddles, buckets, measuring equipment, dust mask, gloves, and eye protection.
At DF Studio NYC, we stock complete microcement starter kits that bundle the essential materials. The SEMCO X-Bond Microcement System Starter Kit includes everything needed for small to medium projects, eliminating guesswork about quantities and compatibility.

| Item | Purpose | Typical Quantity |
|---|---|---|
| Bonding primer | Surface adhesion | 1 liter per 100 sq ft |
| Microcement base coat | Foundation layer | 2-3 kg per 100 sq ft |
| Microcement finish coat | Final surface | 1-2 kg per 100 sq ft |
| Fiberglass mesh | Crack prevention | 1 roll per 200 sq ft |
| Trowels (standard & flexible) | Application | 2-3 pieces |
| Mixing equipment | Consistency | 1 set |
Surface preparation determines whether your installation lasts decades or fails within years.
The substrate must be structurally sound and stable. Microcement bonds mechanically to the surface below and doesn't hide structural problems. Remove loose tiles, cracks, or anything that shifts or flexes.
Clean the substrate thoroughly by vacuuming and wiping with a damp cloth, then allow to dry completely. Dust and moisture prevent bonding primer adhesion and cause long-term damage.
For porous surfaces like concrete, sand lightly to improve primer absorption. For non-porous surfaces like tile, light sanding creates micro-texture for primer grip.
Test porosity by sprinkling water: beading indicates non-porous surfaces needing mechanical prep; immediate soaking indicates porous surfaces needing primer to control absorption.
The bonding primer is the critical layer between your substrate and microcement. Skip this step or apply it incorrectly, and the entire installation fails.
Bonding primers create a mechanical anchor that allows microcement to grip the substrate. Water-based primers like HeyDecco Water Base Primer (Bond & Seal) offer low VOC emissions while providing strong adhesion. The primer penetrates porous surfaces and creates a tacky film on non-porous ones, giving microcement something to hold onto.

Apply primer uniformly with a paint roller for broad coverage and a brush for edges. A typical application covers approximately 100 square feet per liter.
Allow primer to cure fully before applying microcement, typically 2-4 hours for water-based primers, though humidity and temperature affect timing. Premature microcement application causes adhesion failure.
Professional microcement installation depends on proper tool selection and technique. The wrong tools produce visible trowel marks and uneven surfaces.
Use a 12-16 inch stainless steel trowel at a 30-45 degree angle, pushing microcement firmly into the substrate with overlapping strokes. Work in sections, maintaining a wet edge for seamless bonding.
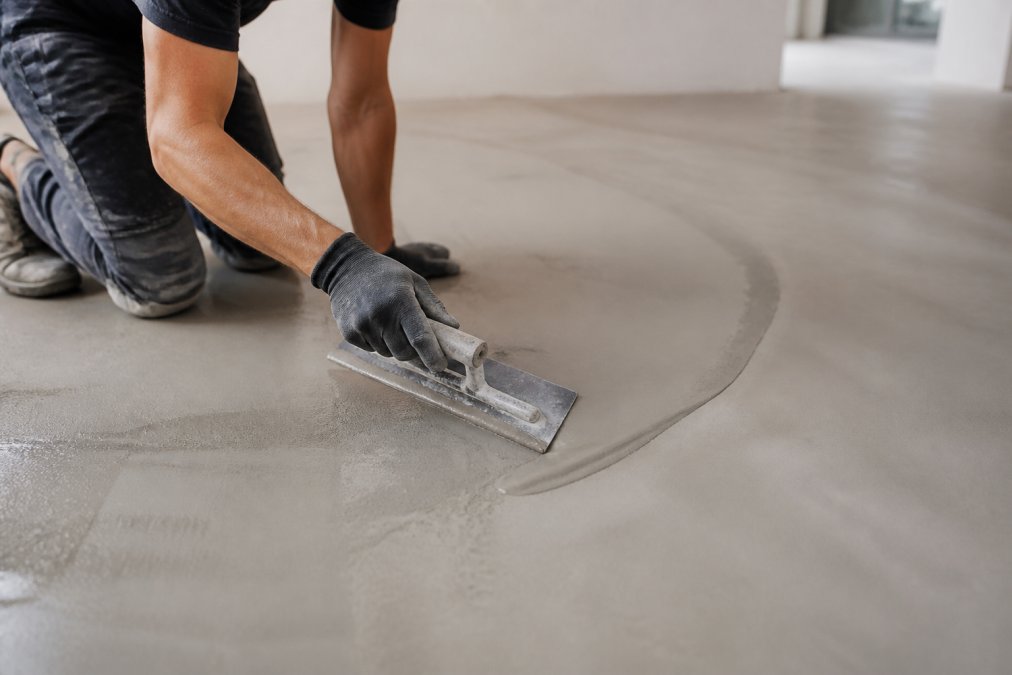
Use a flexible squeegee trowel like the Ecofirm Magic Trowel held nearly flat against the surface with long, sweeping strokes to create a seamless finish.

Apply microcement in thin layers (2-3 mm typical). Multiple thin layers bond better and cure more evenly than one thick layer.
Mix microcement to peanut butter consistency, thick enough to hold shape but wet enough to trowel smoothly. Incorrect consistency affects application and surface quality.
Installing microcement over tile requires specific preparation due to its non-porous, smooth surface.
Tap the tile surface with a hammer to check for loose tiles. Remove and reset any loose tiles, microcement can't bridge gaps or flexing substrate.
Sand grout lines flush with the tile surface or fill with concrete patching compound to prevent ridges from showing through the finished surface.
Clean tile thoroughly with a degreaser if needed, then rinse and dry completely to ensure bonding primer adhesion.
Sand tile with 120-grit sanding pad to open the glaze and create texture for primer adhesion, then vacuum thoroughly.
SEMCO X-Bond Microcement System Starter →
Apply bonding primer to the sanded tile. The primer creates the adhesive bridge between tile and microcement. Without proper primer, microcement simply sits on top of the tile and eventually delaminates.
While tile is common, microcement installation over wood subfloors, uneven concrete, and damaged surfaces requires different strategies that most guides overlook.
Installing over wood subfloors: Install cement backer board over wood as an intermediate layer, screwing it down every 8-12 inches to prevent movement. Apply bonding primer to the backer board, then proceed with microcement application.
Installing over uneven concrete: Use a concrete self-leveling compound to fill low spots before microcement application, ensuring even primer absorption and consistent thickness.
Installing over damaged or patched concrete: Repair cracks wider than 1/8 inch with concrete crack filler and use patching compound for spalled areas. Allow patches to cure fully before primer application.
Installing over existing microcement: Roughen the surface with 80-120 grit sandpaper to remove sealant, clean thoroughly, apply bonding primer, then apply new microcement.
Microcement curing is slower than most expect. Rushing this phase causes permanent damage. Curing time varies based on climate, humidity, and product formulation.
Initial set occurs within 24 hours.
Avoid heavy foot traffic, rolling equipment, or furniture during this period to prevent indentation and damage.
Temperature and humidity dramatically affect curing time in ways that standard timelines don't capture. Understanding your local climate allows you to predict actual curing duration rather than relying on manufacturer estimates that assume ideal conditions.
High-humidity climates (above 60% relative humidity): Add 50-100% more curing time to manufacturer recommendations. Use a dehumidifier to target 40-50% relative humidity, which accelerates moisture evaporation and reduces curing time by 20-30%.
Low-humidity climates (below 40% relative humidity): Mist the microcement surface lightly with water every 4-6 hours for the first 48 hours to slow surface hardening and prevent interior cracking.
Temperature effects: Maintain ambient temperature between 65-75°F for optimal curing. Below 50°F, curing slows significantly; below 40°F, some formulations won't cure properly.
Microcement products vary significantly in volatile organic compound (VOC) emissions, a detail rarely addressed in installation guides but critical for health-conscious homeowners and those with chemical sensitivities.
Understanding VOC content: VOCs are chemicals that evaporate at room temperature, contributing to indoor air quality problems. Water-based microcement primers and topcoats typically contain 0-50 grams per liter (g/L) of VOCs, while solvent-based products may contain 300-500 g/L. Low-VOC products (under 50 g/L) are safer for indoor installation, particularly in occupied homes or those with children and pets.
When selecting microcement products, request VOC documentation from manufacturers. Products labeled "low-VOC" or "zero-VOC" provide safer indoor air quality during and after installation. Water-based bonding primers like those referenced in this guide typically offer lower VOC profiles.
Ventilation during curing: Regardless of VOC content, ventilation during curing reduces airborne chemical exposure. Open windows and doors to create cross-ventilation. Use exhaust fans to pull air out of the space. In sealed or poorly ventilated areas, use portable air purifiers with activated carbon filters to capture VOCs.
Do not occupy the space or place furniture on microcement during curing, even if it feels hard to the touch. Premature use compresses uncured material, creating permanent indentations and soft spots. In humid climates, curing extends well beyond the standard 14-day timeline, verify full cure before resuming normal use.
Understanding common failures helps you prevent them. These mistakes appear in countless installations.
The process to install microcement flooring demands attention to detail and patience, but the results justify the effort. From surface preparation through curing, each step builds on the previous one. Skipping or rushing any phase compromises the entire installation.
Yes, homeowners can install microcement flooring with proper preparation and the right tools, though the results depend heavily on surface prep and application technique. The process requires attention to substrate porosity, primer application, and consistent trowel pressure. Many DIYers succeed with smaller areas like bathrooms or accent floors. For large spaces or complex layouts, professional installation ensures a seamless finish and proper curing. Start with a test area to understand the material's behavior before committing to your entire floor.
Curing time for microcement floors varies by product and environmental conditions. Temperature, humidity, and ventilation significantly affect cure speed. Cooler, humid conditions slow curing, while warm, dry environments speed it up. Follow your specific product instructions, as some formulations cure faster than others.
Yes, you can install microcement over tile floors if the tiles are firmly bonded and the surface is properly prepared. The tile must be cleaned, deglossed, and any loose sections removed. A bonding primer creates the mechanical bond needed for microcement adhesion. This method works well for updating dated tile without removal, though the final thickness adds height at transitions. Ensure grout lines are filled or sanded flush to prevent telegraphing through the microcement topcoat.
Microcement offers a seamless, monolithic finish without grout lines, creating a modern aesthetic that's easier to clean and maintain than traditional tile. It bonds directly to existing substrates. The thin-layer application (2-3mm) minimizes height buildup, making it ideal for renovations. Microcement also provides excellent durability and can be applied over concrete, tile, or wood with proper preparation.