My shopping cart
Your cart is currently empty.
Continue ShoppingLast Updated: October 21, 2026
Terrazzo flooring installation combines precision, timing, and the right materials to create a durable, attractive surface. This guide from DF Studio NYC covers the steps, tools, and techniques that separate successful installations from failed ones, whether you're working with poured terrazzo or terrazzo tile systems.
Terrazzo flooring installation requires careful attention to substrate conditions, material selection, and curing windows. Most failures trace back to poor substrate preparation, moisture problems, or rushing the cure. We'll walk you through each critical stage.
Your substrate determines everything that comes after. A structurally sound, properly prepared base prevents cracks, delamination, and premature failure. Before pouring any terrazzo, verify structural soundness, moisture levels, and surface condition.
A structurally sound substrate means the concrete beneath won't shift, settle, or crack under normal use. Check for:
According to American Concrete Institute guidance on concrete substrate preparation, concrete substrates must be structurally sound and free from movement before installing floor systems. Terrazzo won't compensate for a weak base, it will simply fail faster.
Moisture is the silent killer of terrazzo floors. Excess moisture vapor rising from the substrate causes the system to fail, often years later. Test for moisture before you start.
Moisture testing methods include:
For surface conditions, ensure concrete is clean and free from contaminants. Dust, oil, paint, and old adhesive prevent bonding. Clean with a concrete grinder or pressure washer, then let it dry completely. Old adhesive must be removed or sealed with a compatible primer.
Successful terrazzo flooring installation depends on having the right tools and materials on site. Improvising or using substandard products leads to inconsistent results and failure.
Tool/Material |
Purpose |
Why It Matters |
|---|---|---|
Concrete primer |
Seals substrate and improves bonding |
Prevents terrazzo from separating from concrete |
Terrazzo mixture or tile |
The finish material |
Quality mix ensures durability and appearance |
Controls cracking and creates design |
Prevents random cracks from spreading |
|
Trowels and floats |
Applies and smooths material |
Proper technique requires the right tools |
Mixing equipment |
Blends components consistently |
Uneven mixing causes weak spots and color variation |
Grinder/polisher |
Finishes and seals the surface |
Professional equipment creates a smooth, sealed finish |
Vacuum and dust control |
Manages dust during grinding |
Protects workers and improves finish quality |
For mixing, invest in proper equipment. The PORTAMIX Mega Hippo Professional High-Capacity Mixing Station handles 5-6 bags per mix with built-in dust extraction, reducing on-site dust and improving consistency. At $3,599.00, it's a significant investment, but for commercial projects or high-volume work, it pays for itself through faster, more reliable mixing.

For smaller projects, a standard drill mixer works, but consistency matters, inconsistent mixing creates weak spots and color variation.
Primer is your first critical step. It seals the substrate, improves bonding, and controls dust. Skipping it or using poor-quality primer leads to delamination months later.
Choose a primer matched to your substrate and terrazzo system. For non-absorbent surfaces like ceramic tile or terrazzo, use WAKOL D 3045 Special Primer at $138.85 per unit.
For moisture-sensitive applications or substrates with high moisture vapor emissions, consider Velosit PR 303 Moisture Vapor Emission Control Primer at $546.99 for a 3.5-gallon kit. This epoxy-based system provides superior moisture protection and is essential for below-grade or challenging moisture conditions.
Application steps:
Proper mixing determines the strength and appearance of your terrazzo floor. Inconsistent mixing creates weak spots, color variation, and premature failure.
For cement-based terrazzo systems, use Velosit SC 244 Concrete & Terrazzo Screed Systems at $49.99. This shrinkage-compensated, rapid-strength formulation is designed for terrazzo installations and reaches 12 MPa compressive strength in just 4 hours, allowing faster installation timelines.
Mixing procedure:
For high-volume projects, the PORTAMIX Mega Hippo ensures consistent mixing every batch. Manual mixing often leads to variations that compound across multiple batches.
Pouring or placing terrazzo requires speed, precision, and proper divider strip installation to control cracking and create the intended design.
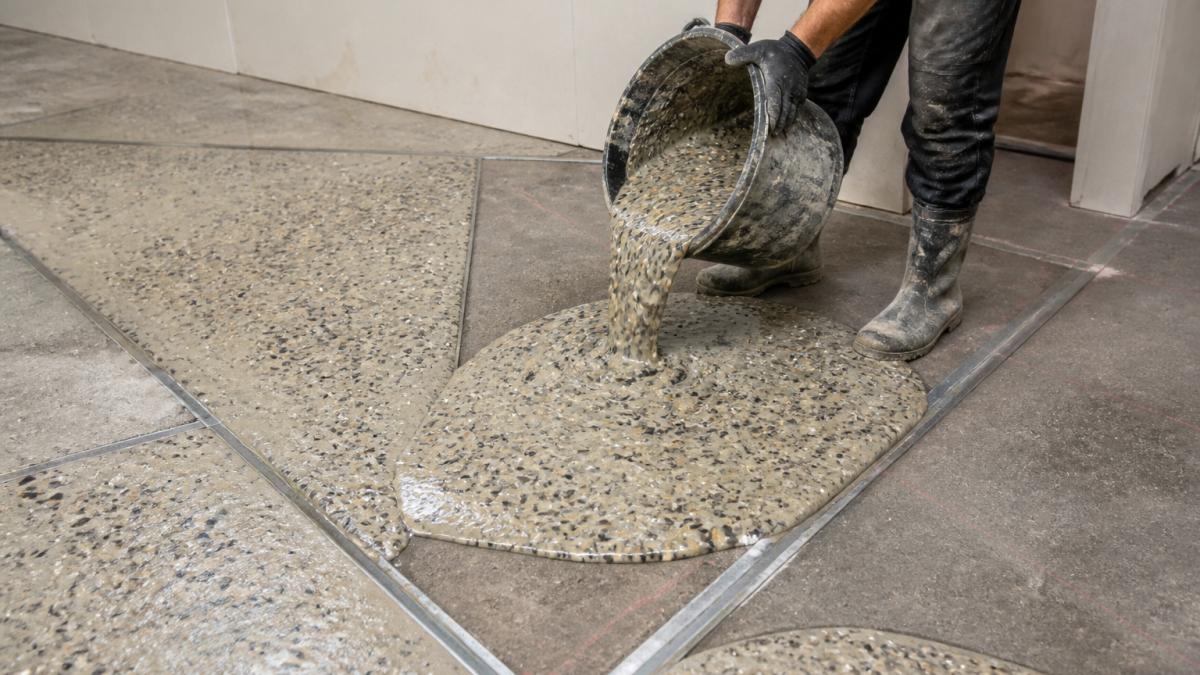
Divider strips serve two purposes: they control where cracks occur and create decorative patterns. Without them, random cracks appear unpredictably across the floor.
Installation sequence:
For poured systems, work in sections if the floor is large. Completing one section before starting the next ensures consistent appearance and prevents cold joints where sections meet.
Velosit SC 244 Concrete & Terrazzo screed Systems →
After pouring, curing, grinding, and polishing determine the final appearance and durability of your terrazzo floor.
Curing time varies by system. Rushing this stage is the single most common cause of installation failure. Premature grinding, foot traffic, or floor covering installation causes delamination and surface failure.
Typical curing timelines:
These timelines depend on temperature, humidity, and product. Velosit SC 244 reaches walkable strength in 4 hours, but full cure still requires 7 days before heavy use. Check the technical data sheet, don't estimate.

Temperature and humidity affect curing speed. Cold, damp conditions slow curing. Warm, dry conditions accelerate it. Maintain 60-75°F and 40-75% relative humidity during curing for consistent results.
Grinding exposes the aggregate and creates the characteristic terrazzo appearance; polishing seals and protects the surface. This stage transforms a rough, dull surface into a smooth finish.
Grinding sequence:
For professional results, use equipment designed for terrazzo. The WerkMaster Miroir Professional Stone Refinishing System at $6,495.00 is purpose-built for polishing and cleaning stone and terrazzo floors.
Polishing typically follows grinding. Apply a polishing compound and buff the surface with fine pads until it reaches the desired gloss level. Multiple passes may be needed for a high-polish finish.
Sealing protects terrazzo from stains, moisture, and wear. On-site sealing is the industry standard, applied after grinding and polishing and cured before use.
Sealer selection depends on the terrazzo type and intended use:
Application procedure:
These are the most common terrazzo flooring installation failures and how to fix them.
Delamination or separation from the substrate: This happens when primer is skipped or substrate isn't clean.
Uneven color or appearance: This results from inconsistent mixing or uneven application.
Surface remains dull after polishing: Inadequate grinding or sealing.
Floor is slippery after sealing: High-gloss finishes can be slippery, especially when wet.
Divider strips separate or shift: Improper installation or inadequate adhesive. Prevention: secure divider strips firmly before pouring.
Terrazzo flooring installation is a multi-stage process that demands attention to detail at every step.
DF Studio NYC supplies the professional-grade materials and equipment needed for successful terrazzo flooring installation. From primers like Velosit PA 911 and WAKOL D 3045 to mixing equipment and finishing systems, we provide the products contractors trust for consistent, durable results.

Start by inspecting the substrate for structural soundness, cracks, and moisture issues. Clean the surface thoroughly to remove dust, debris, and old adhesive residue. Apply a primer like WAKOL D 3045 Special Primer or Velosit PA 911 Acrylic Primer to improve bonding. Use a leveling compound such as LOBA WAKOL Z 631 to create a smooth, flat surface. Allow proper curing time before proceeding with terrazzo installation.
Terrazzo floor curing time varies by system. Most installations are walkable within 24 to 48 hours, though moisture-sensitive floor coverings may require 48 to 72 hours. Epoxy terrazzo systems typically cure faster than cement-based systems. Full strength is usually achieved after 7 days. Always follow the manufacturer's specifications for your specific terrazzo mixture and environmental conditions.
Yes, terrazzo can be installed over properly prepared existing floors, including concrete, ceramic tile, quarry tile, and terrazzo. The key is thorough surface preparation: the existing floor must be clean, structurally sound, and free of moisture issues. Apply primer and leveling compound as needed. Non-absorbent substrates may require special primers to ensure strong bonding.
Common mistakes include: skipping substrate inspection and moisture testing, applying terrazzo over unstable or unprimed surfaces, improper mixing ratios or inconsistent mixing, pouring during unfavorable temperature or humidity conditions, inadequate curing time before grinding, and rushing the polishing stage. Poor divider strip installation can also cause cracking. Always follow manufacturer guidelines and allow proper cure windows between each installation phase.